Getting Started: A Practical Guide to Installing and Deploying the ChromeOS Readiness Tool with Enterprise Deployment
In an era where IT modernization is paramount, organizations are continuously seeking efficient and secure pathways to evolve their infrastructure. The ChromeOS Readiness Tool stands as a valuable asset in this journey, offering a comprehensive compatibility assessment for a seamless transition to ChromeOS. For organizations that operate within established on-premise environments and rely on traditional IT management, the Enterprise Flow (also referred to as Enterprise Installation) provides a robust and integrated deployment solution.
This guide will navigate you through the installation process and highlight the essential components of deploying the ChromeOS Readiness Tool using the Enterprise method.
Understanding the Enterprise Flow
The Enterprise Flow is specifically engineered for environments that leverage Active Directory and Group Policy Objects (GPOs) for their IT management. It is the ideal choice for organizations that operate without a Unified Endpoint Management (UEM) system and are built upon an on-premise infrastructure. A key characteristic of this flow is its automated data collection agent, which simplifies the gathering of assessment data.
The Installation Journey: Enterprise Method
The initial step for installing the ChromeOS Readiness Tool begins with downloading and running the provided MSI file. An administrator must first install the tool on their admin machine before initiating an organization-wide deployment.
Once the installer application is launched, the configuration specific to the Enterprise Flow begins:
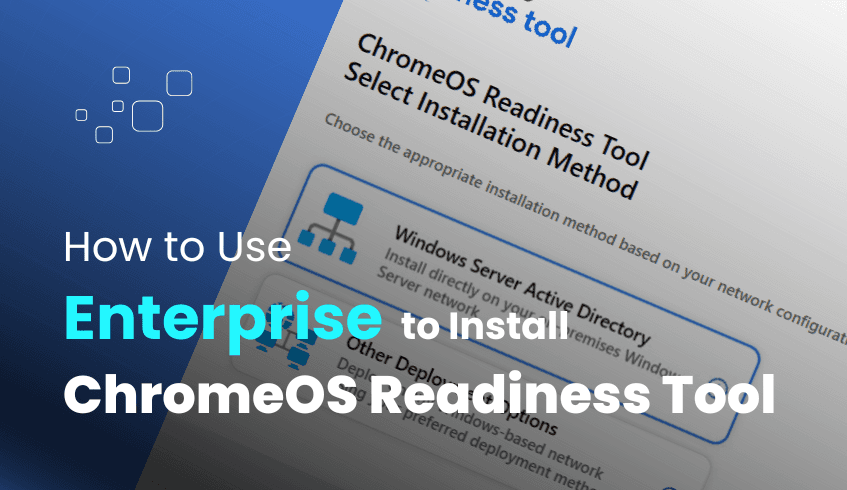
Select Installation Method: The installation wizard will prompt you to choose the installation method. For the Enterprise Flow, you will select the "Windows Server Active Directory" option. This ensures compatibility with your existing Active Directory and GPO infrastructure.
Choose Storage Options: You will then select where the assessment results will be stored. The Enterprise Flow supports two primary storage options:
Network Shared Folder: Assessment results can be securely stored in a selected network shared folder within your on-premise infrastructure. Data will be stored here if this option is chosen. Only authorized personnel with appropriate permissions can access this shared folder, and employee access to this data is restricted.
GCP Cloud (Storage Bucket): Assessment results can also be stored in a GCP (Google Cloud Platform) storage bucket. If this option is selected, data will be stored in both the GCP storage bucket and the network shared folder. To enable this, you must grant the storage object admin role to the provided service account within your GCP project. You may select the GCP storage and network shared folder option to store results in both locations.
Sign In with Google Account: You will be required to sign in with a Google account if you select the GCP storage and network shared folder option. This account will later be used to access and view the Pro dashboard.
Enter Company Information: Provide your company's name and the address details. You also have the option to upload your company logo, which can be displayed on your personalized dashboard.
Connect to Cloud Storage (if applicable): If you choose the GCP Cloud storage option, you will connect to your company's Google Cloud Storage. As a Pro user, you will choose the "company Google Cloud Storage" option. As a Partner user, you will choose the cloud storage bucket provided by your partner. Ensure you grant the storage object admin role to the provided service account in your GCP project.
Configure Deployment Settings: In the deployment configurations, you will select the number of days for the data collection period. The final report will be generated after this period. Additionally, you can enable the browser insights feature and choose to hide the tray application on client PCs.
Select Domains and Organizational Units: You will then select the preferred domains and organizational units (OUs) within your organization where you want to install the tool. This is a one-time installation, so it's crucial to select all desired domains and units as changes cannot be made after installation.
Deploy and Install: Click "install" to deploy Group Policies and install the tool. Once the GPOs are updated and linked successfully, a configuration complete message will appear.
Export Private Key: After the installation is complete, you will be prompted to export your private key file. It is essential to save this key file securely, as it is necessary for viewing the readiness assessment details in the Pro dashboard if applicable.
Once deployed, for the data collection to begin and Group Policy to activate, devices need to be restarted approximately 90 minutes after the administrator deploys the application. The collected data will be temporarily stored on employee devices and will later be pushed to the selected network storage location or cloud storage. Data collection will proceed for the selected duration, ultimately generating the final report. If PCs are powered off, data will not upload until the PC is on.
Conclusion
The Enterprise Flow of the ChromeOS Readiness Tool provides a robust and tailored solution for organizations deeply integrated with Active Directory and operating within an on-premise infrastructure. It empowers IT teams with detailed compatibility assessments and secure data handling, enabling a confident and strategic approach to migrating to ChromeOS.
To embark on your ChromeOS migration journey, visit the official website to schedule a demo and select the Enterprise installation method that aligns with your organization's infrastructure.